Showing posts with label Reviews. Show all posts

Monday, 27 August 2012

REVIEW: TOO FACED NATURAL EYE COLLECTION

Hi everyone :) I hope that you all had a good weekend. This week I've been busy packing up all of my stuff and running a million errands trying to get ready for law school. I can't believe that I move on Saturday - it seems like time flew by!! I'm so excited to start a new chapter :)

Today I'm going to do a review on the Too Faced Natural Eye Neutral Eye Shadow Collection (find it here). I got this palette from my friend Alex for my birthday last week and I've been using it everyday since. I really love the colours and the shimmery finish that the shadows have. Check out my review below :)
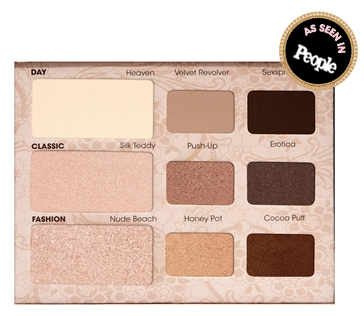
 
Pigmentation: The pigmentation in this set is really great. The shadows go on true to colour, although some are obviously more visible than others. I particularly like the pigmentation in Silk Teddy. The colour is so pretty and shimmery without being glittery and it lasts all day long.
Score (out of 10): 10

Application: For the most part, the application is smooth and even. Since most of the colours are very shimmery, they take a little more work to blend out, especially when compared to the matte colours in the palette. For instance, Honey Pot, Silk Teddy and Push-Up all take a little longer to blend than Heaven, but they all transfer evenly onto your eyelid after some gentle brushing.
Score (out of 10): 9

Colours: I LOVE the colours in this palette! Even though it's a natural eye colour set, there are more than enough colours to do both a day and evening look. I like to wear Heaven as a base coat all over my lid, with Velvet Revolver in the crease and Silk Teddy as a highlight under the brow and in the inside corners of my eyes. It's so shimmery and gorgeous without being too in-your-face.
Score (out of 10): 10

Packaging: I don't normally put much value in the packaging of a product so long as it's functional, but this Too Faced palette has particularly good packaging. Not only is the box adorable (point for cuteness!), but it comes with three little eye charts with suggested makeup looks. It's such a great way to experiment with the palette and get ideas for new looks. And then when you're all done with them, they slip back into the lid and out of the way. Genius!
Score (out of 10): 10

Total (out of 40): 30.00 - 98% wooo!!!

Wishing you fun makeup looks and shimmery eyes!
Talk soon,
Vi

Thursday, 7 June 2012

REVIEW: PUR MINERALS GET A LITTLE

Hi everyone :) I don't know about you, but I have vacation fever. I've been working like crazy at my summer job (which is why I haven't been able to post in a whole week - yikes!) and I'm spending my days dreaming about the beach. But just because you're stuck in a summertime rut doesn't mean that you have to look like it! Spice up your staycation with the awesome Get A Little self-tanner from Pur Minerals (find it here).

As you all know my skin is very sensitive to the sun, so natural tanning (or tanning beds for that matter) is out of the question. If you want to protect your skin from the sun's harmful rays but still have a summery glow, this is definitely the tanner for you. Unlike other tanning creams and foams, Get A Little doesn't contain chemical dyes or formaldehyde. Side note: How gross is it that some tanners use the same chemical to colour your skin as your high-school science teacher used to pickle fetal pigs *shudder*. Pur Minerals' tanner is also 100% paraben-free!
____________________
Colour: One of my biggest pet peeves is when people have noticeably fake tans. So many self tanners turn your skin orange or leave a dark residue around your hairline and elbows, but Get A Little leaves you with a beautiful light brown 'tan'. I've used this product at least a dozen times and I've never had any trouble with the colouring. It's also quite easy to control the darkness of your fake tan - just apply it anywhere from one to three days in a row.
Score out of 10: 10
Application: Like all self tanners, applying Get A Little takes a bit of practice. Always exfoliate your entire body before applying a tanner. For the best results, pay extra attention to your feet, elbows and knees so that the colour doesn't concentrate in those regions. Then all you have to do is rub the tanner into your skin as if you were using lotion. In fact, the formula is quite moisturizing, so it won't leave your skin feeling dry or flaky. If you follow the instructions carefully and rub the self tanner into your skin thoroughly, you won't have any streaks :) The only time that I got a streaky tan using Get A Little was when I rushed the application and didn't take the time to really rub it in properly. Another great thing about this product is that it doesn't rub off on your clothes and bedsheets. I have a white duvet and white sheets (dangerous, I know) and I've never had any problems with colour transfer.
Score out of 10: 10
Scent: Okay, here's the kicker. It doesn't smell very good. It doesn't smell bad...but it doesn't smell good either. Don't get me wrong, compared to other self tanners - which tend to smell like rat poison - Get A Little smells awesome. But it still smells like a self tanner. Thankfully the smell doesn't linger on your clothes or bedsheets and, once you shower, the smell completely disappears.
Score out of 10: 7

Total Score: 27 out of 30 - 90%
Wishing you sun and relaxation!
Talk soon,
Vi

Thursday, 31 May 2012

FEATHER HAIR EXTENSIONS

Hi everyone :) Phewwww, has it ever been a crazy week at work! I'm so excited to be back at my keyboard - I've found a great (and affordable) product for us all to try. I first saw these feather hair extensions on Anna Saccone's blog The Style Diet a couple of weeks ago and was really excited to try them. They are made by Picasso Hair Feathers and are 100% cruelty free. I didn't realize that hair feathers could be cruelty positive, but apparently roosters are killed in the making of some brands. With Picasso, you can rest assured that the feather came from a rooster's butt to your head with no pain to the bird!

Picasso extensions are kink-free and super easy to care for. All you have to do is wash and style your hair normally and they will last 4-6 weeks. Just be careful to set your hot styling tools to 100-180 degrees before you style the extension. I ordered two individual strands to test them out first and I was so impressed that I bought another package of 5 feathers in Puppy Love (light pink, hot pink and brown). Both shipments were delivered within the week. Better yet, shipping is free to Canada and the United States!

There are plenty of helpful video tutorials and FAQs on the Picasso website but I thought that I'd do a photo tutorial of my own on this page as well. My mom graciously offered to be my model, so check out how to apply the extensions below:

STEP 1: Your extensions will come all sealed up neatly in a little bag. Take them out of the shipping envelope and remove the feather bundle from its package. There are some styling instructions on the insert, so make sure you save it for later.

STEP 2: Decide which colour extension (or extensions) you want to apply. My mom and I both applied light pink ones in each other's hair tonight. I prefer the neutral-coloured extensions like brown, grey and pink, but they also have all sorts of bold colours if you prefer a bit of drama.

STEP 3: Decide where you want your extension to go. You want to be sure that the metal clasp is hidden under a layer of hair so that it doesn't show when you wear your hair down. You also want to make sure that it isn't too close to the nape of your neck, because then it might show when you wear a ponytail. Pin up a section of your hair and you're ready to go.

STEP 4: Choose a thin strip of hair - about the same thickness as the extension itself - and loop the little plastic applicator over the strand. Now here's the trick that I missed the first time that I applied one of the feathers. Pull on the end knob of the plastic applicator. This will tighten the loop. Once the loop is tight around the base of your hair, give it a tug and pull the hair strand all the way through the metal clasp. The plastic loop will fall off and both the feather and your hair strand will be inside of the loop.

STEP 5: In order to secure the extension, grab a pair of pliers and squeeze the metal clasp shut. Be sure to give yourself a little bit of wiggle room between the metal clasp and your scalp. The first time I applied one of these extensions, I fastened it a little too close to my head and it pulled for a day or two.

STEP 6: Last but not least, snip the end of the extension to match the length of your hair. Another great thing about Picasso extensions is that they are guaranteed to be at least 14" in length. I hadn't had a haircut in a very long time (which I finally took care of this evening - phew!) and the extensions were still long enough to match my ends, so they are great for girls with extra long hair.

Voila! Easy peasy :) This is the final product - aren't they lovely? I like that they peek out from underneath your hair to give you a little oomph, while still being subtle enough to wear to work.

Have any of your guys tried feather extensions?
Talk soon,
Vi

Friday, 18 May 2012

REVIEW: SALLY HANSEN POLISH STRIPS

Hi guys! Today I'm going to do a review of Sally Hansen's Salon Effects Real Nail Polish Strips. Being a self-confessed manicure snob (check out my review on Shellac here), I had been curious about this product for a while. Easy application, flawless finish and hard-as-nails durability all in one go? It seemed too good to be true, so I decided to test them out myself. I chose a light pink-nude colour (I'm a bit of a creature of habit when it comes to nail colour) called Tu Tu Much for my test run. Here are the results:

Application: The first strip that I applied to my nail was a bit of a learning curve and I ended up removing it and trying again. In theory, the application is very simple. All you have to do is peel off the backing and stick the strip onto your nails. In reality, it takes a bit more maneuvering. The strips are very thin, so I found that the hardest part was lining the bottom of the strip up with the base of your nail without ripping the polish. That said, filing off the top of the strip is super quick and easy. In all honesty, it's probably just as much hassle as painting on nail polish the old-fashioned way.
Score out of 10: 4
Finish: The biggest disappointment with this product was definitely the finish. The reason that I love salon manicures and Shellac is because the finish is smooth and glossy (almost wet-looking) even after it's dry. From far away the polish strips look glossy and smooth, but upon closer inspection you can see all sorts of little bubbles and tears. Although, I do think that the poopy finish might have to do more with my colour choice than the product as a whole. The strips were an opaque pink in the package, but once I peeled off the backing, the colour was completely translucent. I tried adding a second layer, but the finish was still so-so. I would definitely recommend sticking to the patterned strips if you are going to use this product. They look much more opaque.
Score out of 10: 2
Durability: What this product lacks in finish, it certainly makes up for in durability. So far, I've been wearing the polish strips for three days and they still look exactly the same as they did when I applied them. I have typed endlessly on the computer, beaten them up on a waitressing shift and washed my hands repeatedly with little to no effect. While they do have little bubbles and tears, those were there when I applied them.
Score out of 10: 10
Colour Selection: I think the main attraction of this product is all of the crazy patterns that you can get. I did a bit of research to see if anyone else had trouble applying them and it seems that the patterned strips work much better than plain coloured ones. If that's true, then they have a very wide range of patterned polish strips to choose from and - as long as you steer clear of the solid strips - you'll have plenty of selection. To see the whole range of colours and patterns, click here.
Score out of 10: 7
Price: The cost of one package of nail strips here in Canada is usually around $10, but I purchased them on sale for $7.99. The package gives you 16 nail strips of varying sizes, which is enough to do one complete manicure. Even if you bought two packages, the different sizes mean that you wouldn't necessarily be able to do three complete manicures. So while they are slightly more affordable than paying for a professional manicure (which can range anywhere from $5 to $30), they aren't really cost effective unless you buy them on sale.
Score out of 10: 6

OVERALL SCORE: 60% (C-)

Have a great weekend everyone!
Talk soon,
Vi

Saturday, 14 January 2012

REVIEW: SHELLAC BY CND

I must confess: I am a huge fan of manicures. I love the look of perfectly shaped, perfectly polished nails, but I hate spending $20-$30 dollars on something that will be chipped and flawed within a couple of days. That being said, I'm pretty lucky in the nail department. Since I have ABS, I only have two nails to shape, paint and primp, but it still drives me absolutely nuts when they're flawed (read: first world problems).

Thankfully, the gods of nail care heard my plea and invented a great new product that solves all of your manicure woes! Allow me to introduce you to Shellac. If you haven't already met, then take a gander at the picture above and check out my hard-as-rock, not-flawed-at-all nails (please forgive my scaly skin - this winter weather is giving me a severe case of lizard hands.)


Here are the reasons why I love Shellac:
  1.  Since it dries using UV light rather than air exposure like a normal polish, there is a very short drying period 
  2. No chips, flaws, weird imprints from your bedsheets/socks/gloves or other annoying problems that you have with a normal polish
  3. It goes directly onto your natural nails and *drum roll* doesn't leave them brittle and gross afterwards
  4. It's mirror-like finish lasts for about two weeks 
Here are some less awesome things about Shellac:
  1. You have to have it professionally done because of the UV lamp required to dry the polish
  2. You have to use 100% acetone to remove it after two weeks (I usually use a heavy moisturizer afterwards)
Here's the skinny on Shellac. This new(ish) product works like a polish-gel hybrid. I was pretty skeptical at first, because I really hate those goopy-looking gel nails with the long fake tips. That being said, I asked about Shellac this summer when I went to the salon to get my nails done before I went on vacation. Seeing as I was about to leave for six weeks to a reasonably remote island in the south Aegean where you run a significantly higher chance of encountering a goat in the middle of the street than a nail salon, I decided I could use the extra staying power. I was very pleasantly surprised! The no fuss, no muss application was rivaled only by the fact that it stayed flaw-free and shiny for two weeks, despite being exposed the airport baggage claim, some nervous cuticle picking and many a sandy beach. All in all, Shellac is a great way to get hard, shiny, natural nails. What can I say... I'm a convert!

*Side note: When I went to get my nails done in the colour featured above (it's called Beau), which I thought to be a very tasteful and classic nude, the manicurist essentially told me that I was boring haha! She kinda shrugged at my nails and said that I should pick brighter colours. I don't know why, but I think that's so funny :)

Still not convinced? Check out CND's website here.

Wishing you non-boring nails!
Talk soon,
Vi

Monday, 14 November 2011

TOP 5 FAVOURITE BEAUTY PRODUCTS

1. All About Eyes Concealer, Clinique

This is my all-time-favourite, can't-live-without-it beauty product. Just a touch and your eyes will instantly look brighter! There are a couple things that can accentuate dark circles. The obvious answer is that you don't get enough sleep; sleepy complexions are paler than normal, making your under-eye circles look more pronounced. Dark circles also tend to be more noticeable on pale or olive-toned skin. Since my natural complexion is very pale with olive (rather than red) undertones, I pretty much came out of the womb looking tired.

That being said, I have tried just about every kind of under-eye concealer and nothing comes close to All About Eyes. Clinique's concealer has heavy yellow undertones that counteract the purple and grey under your eyes. I use #03 Light Petal and it works like a charm! Another reason that I love this concealer is that the yellowness also combats any hormonal redness, so it doubles a concealer for around my chin and nose. Best of all there is absolutely no greyness or chalkiness. Just smooth, fresh-looking eyes! Perfection!

We all know it. Moisturizing your face is crucial to healthy, young-looking skin. But who can stand the oily residue left by so many moisturizers? Not to worry, Biore's Nourish Moisture Lotion is here! I found this moisturizer a couple of years ago after stealing some from my friend at a sleepover and I have never looked back. My skin is a typical combination complexion; I get oily around my t-zone (across your forehead and down your nose), but dry around my nostrils and chin.

Biore's face cream is nourishing and moisturizing without being heavy. It's also oil-free and it even smells nice! I use it in the morning after I wash my face - before any makeup - and it immediately relieves any tightness or dryness. I also use it before bed to stay nice and hydrated. Added bonus: it has SPF 15 which keeps your skin protected from the sun on a day-to-day basis.

3. Velvety Powder Blush, Marcelle

Marcelle is a great hypo-allergenic skin care and cosmetics line for people with extra-sensitive skin. My sister is allergic to most kinds of eye makeup, so she introduced me to a variety of their products. The Velvety Powder Blush became an instant favourite. This blush blends seemlessly into your skin and doesn't leave you feeling cakey or powdery. I like to use a big fluffy brush to blend it into the apples of my cheeks and back into my hairline. 

The best part about Marcelle's blush is that it the colour is super-pigmented, so it lasts a long time. Unlike many powder blushes, it looks the same after hours of wear. The rich colour choices suit a variety of skin tones and instantly bring a healthy-looking glow to your face.

4. LastBlast Volume Blasting Mascara, CoverGirl

Covergirl's LashBlast mascara is the best of both worlds. It elongates and thickens your lashes in one go. With two quick coats, you can have fake-lash lashes without the all the hassle of glue. I wear this puppy everyday and there's no flaking, smearing or smudging. Another bonus is that it comes off easily with a light makeup remover or even with soap and water. I've tried the black and brown versions and loved them both; the black gives you instant drama, while the brown lends you a doe-eyed, summery look.

I would also recommend the waterproof version. I am usually very wary of waterproof mascaras since I hate using harsh makeup removers, but this came off at the end of the day with a little petroleum jelly. No fuss, no muss. It took quite a beating during the day, when I wore it to the beach while I was on vacation in Greece. Despite the heat, sweat, salt water and sand it stayed put. Very impressive!

Last but not least, I added Maybelline's Eye Studio gel liner. I am a big fan of winged eyeliner, but I found that liquid liner was too much of a pain in the butt for everyday wear. Although pencil liner worked pretty well, it lacked the crisp, defined edge of a liquid liner. Maybelline's gel liner is the perfect solution! It has none of the hassle of liquid liner, but all of its precision. The brush that's included in the package is alright, but I prefer to use an angled eyeliner brush. Just dip it in the little pot and draw on a smooth, straight line. 

The Eye Studio liner lasts pretty well, with only a little fading by the end of the night, but I like to pack a black eyeshadow on top of it (still using the angled brush) to give it extra staying power. I've tried the black, charcoal and brown colours and all of them are great. I especially like the charcoal for everyday since it's a little less harsh than black. Definitely a must-have for the cat-eyed convert!

Hope these products are as great for you as they are for me!
Talk soon,
Vi

Monday, 24 October 2011

BOOK REVIEW: PARISIAN CHIC

This is by-far one of the best style guides that I've read! Written by Parisian fashionista Ines de la Fressange with Sophie Gachet, Parisian Chic is divided into three easy-to-use sections. The first part of the book was actually the inspiration for my "Building a Wardrobe" series; it explains all the must-have pieces of a Parisian-inspired wardrobe and how to style them. Next, de la Fressange has a small section on beauty products and makeup and, finally, a longer section on where to shop in Paris. Although the last section may not seem immediately useful to those of us not living in Paris, it provides some great ideas for inspiration, like army surplus stores, spice shops, flower markets, spas and more. It also has a component on kid's clothing, as well as some great storage tips!

This book is particularly great because de la Fressange knows her stuff. As a former model, fashion designer and muse of Karl Lagerfeld, the author is familiar with the fashion world and how to dress various shapes and sizes. I particularly love how she breaks down her wardrobe into a selection of important statement pieces. Absolutely worth the read!

Overall: A+
Organization: A+
Practicability: A
Writing: A+ (plus lots of cute illustrations to demonstrate her points)