Sunday, 20 November 2011

HOW TO: SET A DINNER PARTY TABLE


I love hosting dinner parties! They bring together all of your friends, introduce you to new people and give you an excuse to eat extra delicious food. Added bonus: you get to dress up :) In order to dress up your table, however, you have to know how to properly set it.

Since people don't really study etiquette anymore, full table settings have become reserved for restaurants and weddings, but don't let that stop you from spicing up your table at home. Don't worry, it's not as hard as it looks! I've worked for a catering company for a couple of years now and I'm pretty sure I could do this in my sleep. Practice makes perfect.

1. Dinner Plate
This one is pretty obvious. If you are putting dishes on the table where people can serve themselves, then put the plate in the centre of your setting. The bottom of the plate should be flush with the edge of the table. If you are plating dinner in the kitchen and then carrying the full plates to the table, then leave an empty spot in the setting where you can set it down when the time comes.

2. Soup Bowl
If there's a yummy soup on the menu, plop the bowl in the centre of the dinner plate. Again, if you are serving in the kitchen beforehand then just leave a space.

3. Cutlery
This is where it gets a little finicky. First put down the dinner knife. It goes directly to the right of the dinner plate, facing inwards. Slide it down so that it's flush with the edge of the table. Next, put the soup spoon to the right of the knife. It should also lay flush with the table edge. After that come the forks. Put the dinner fork opposite the dinner knife; directly to the left of the plate and flush with the table. Then lay down your salad fork. The salad fork goes to the left of the dinner fork, but you have to slide it up so that it's about two inches above the table edge. I have no idea why it's done that way, but there you go. 

Last but not least, you have the dessert fork and the coffee spoon. These go horizontally above the dinner plate. The spoon goes right underneath the coffee saucer, with the bowl facing towards the left. The dessert fork goes underneath the coffee spoon, but facing the other way. I always remember this by thinking that the forks aren't allowed to look at each other :)

4. B&B Plate
The bread and butter plate is next. Put it down to the left of the salad fork. Easy peasy.

5-6. Glassware
Finding the right spot for the water glass is simple; it goes just above the dinner knife. Then, use the water glass to measure where you put the wine glass. The wine glass should go behind the water glass on a slight angle towards the left. If you have a champagne glass on the table as well (fancy pants!), it also goes behind the water glass but on a rightwards angle instead.

7. Coffee mug and saucer
Last but not least is the coffee cup and saucer. If you are bringing a coffee jug to the table, then it's easiest to put the cups and saucers on the table too. On the other hand, if people are going to the kitchen to get coffee, then just leave them off the table. Slide the coffee saucer down the table so that it sits right above the coffee spoon. The rim of the saucer should cover the spoon just a tad. Next, place the coffee mug onto the saucer, facing up. Some places turn the mug upside down, but etiquette-wise it should be facing up (not that it really matters).

ALL DONE!
If you want to add fancy cloth napkins, here are two ways to fold 'em up.

Option One: The Water Glass

Step 1: Lay the napkin flat. Pinch the centre and pull up so that the napkin falls into a triangle shape. It doesn't have to be perfect, they'll look the same at the end.


Step 2: Fold the bottom (pointed) part upwards. Collect the whole napkin in your hand and push it into the glass. The folds will make it stand up straight. All done!


Option Two: The Pocket Fold


Step 1: Lay the napkin flat and then fold the top edge about 1/4 of the way down.


Step 2: Next, fold the bottom edge up to meet the top fold.


Step 3: Fold the left edge over so that it meets the middle of the napkin. Do the same on the other side, but only fold it halfway to the middle.


Step 4: Lastly, flip the shorter folded side over. Leave about a 2'' gap (see below) and then turn it right side up. If you have a printed menu or keepsake, slip it into the pocket (see above).

With a couple of easy steps, you'll have the nicest table in the neighbourhood :)
I'm working on an 'outfit of the day' post as we speak, so it should be up shortly!
Talk soon,
Vi

Saturday, 19 November 2011

BIRTHDAY BOY

Hello! Yesterday night I went out to dinner with my parents, my sister and my parent's friends to celebrate my dad's 50th birthday. To see what I wore click here. The evening was full of laughter, great food and funny stories :) We all had the best time together. Happy Birthday Daddy! 

Now we have to recharge after the 'friends party' and do it all over again tonight for the 'family party'. Can't wait.

Birthday kisses!
Talk soon,
Vi

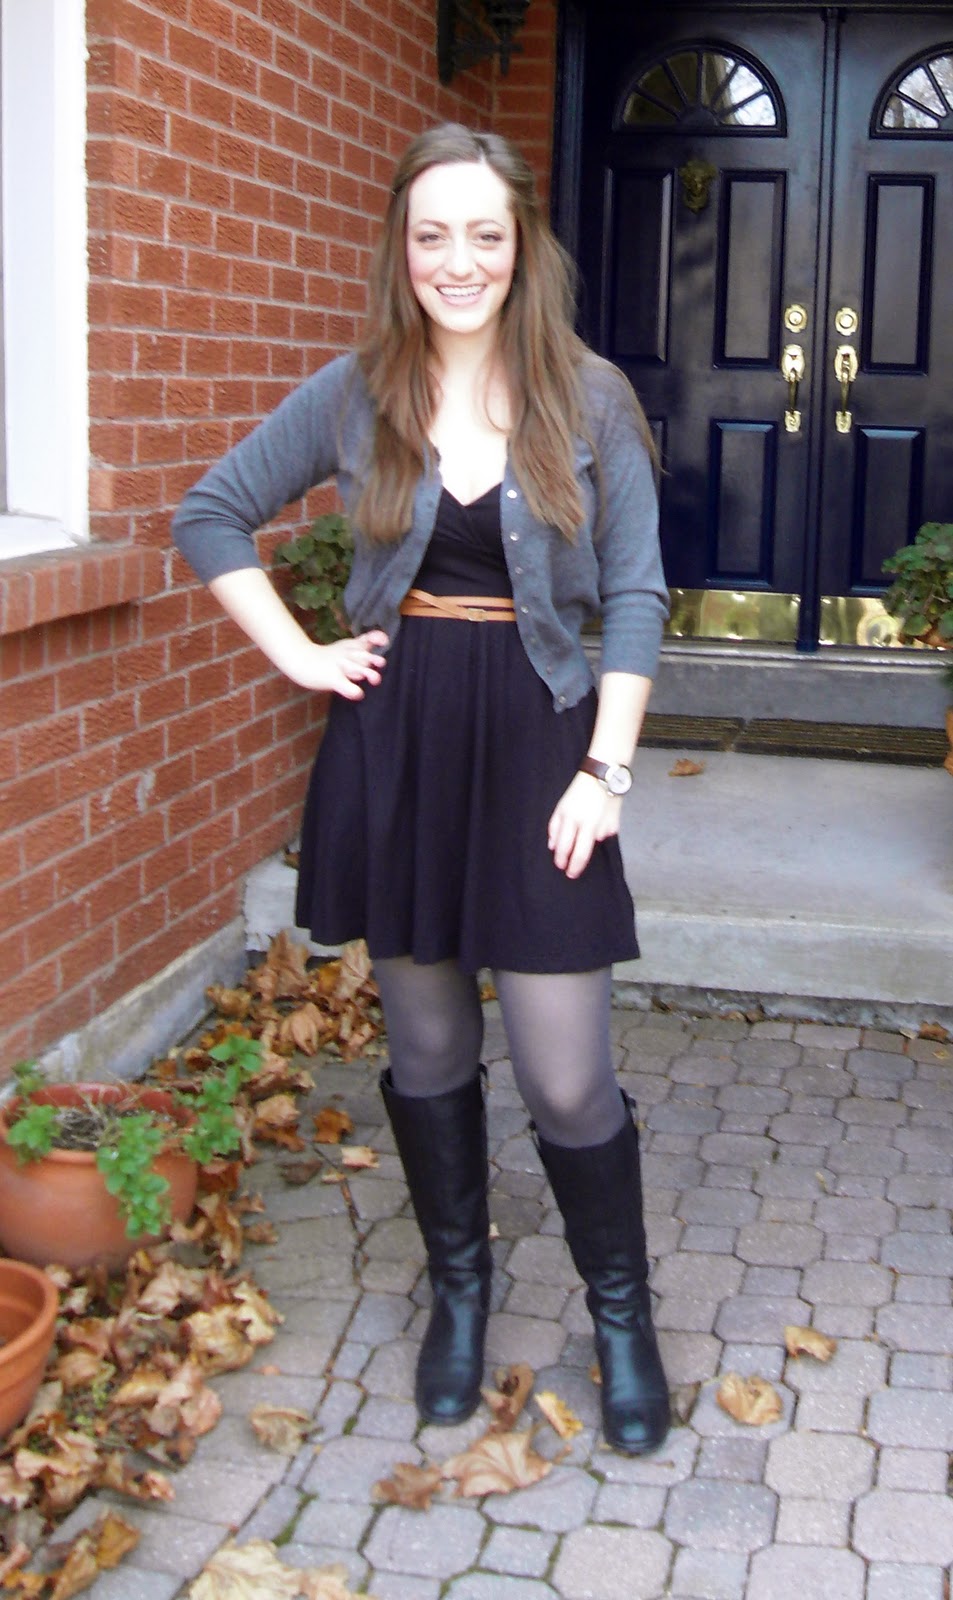
OUTFIT OF THE DAY

Dress: Guess (find a similar one here)
Cardigan: Joe Fresh (find a similar version here)
Bag: Marche aux Puces Clignancourt, Paris (find a similar one here)  
Jacket: Forever 21 (find it here)
Watch: Couturier, Tissot (find it here)
Boots: Kolding, Ecco (find it here)
Belt: Forever 21 (find a similar one here)
Earrings: Ardene (find similar ones here)
Scarf: Chinatown stall, Montreal (find a similar one here)
Tights: Joe Fresh

Good morning :) Today is my dad's 50th birthday! Even though he's still not feeling 100%, we're going out for dinner tonight at the local pub to celebrate. I really like the idea of wearing a casual dress for this kind of an event, since it's the perfect way to get a relaxed look without looking sloppy. 

This dress is one of my favs because it's so versatile. In the summer, I'll wear it with a pair of sandals, a belt and a sun hat, but it's just as easy to style for colder weather. To keep warm I added a pair of grey tights (they are more opaque than they look in the picture) and a great cardigan from Joe Fresh. When you're picking a cardigan, make sure that it has a strong structure - look for clues like buttons, darts, seaming, etc - so that it doesn't loose it's shape. 

For accessories, I wore this pretty pair of wood and gold earrings and a double wrap belt from Forever 21. I went for black boots instead of brown ones to avoid getting too matchy-matchy. As you know by now, I'm a huge fan of Ecco footwear. These boots are made from a great buttery leather with a shiny (but not patent) finish. Love them!

Finally, I threw on my faux leather bomber jacket and a black and white cheetah print scarf that I found in a stall in Chinatown in Montreal. If you're in the area, it's definitely worth perusing all of their amazing (and cheap!) printed scarves.

Talk soon!
Vi

Wednesday, 16 November 2011

HOW TO: COOL & CRAFTY CARDS


Hey everyone! Today's post is not fashion or style related, but it's another one of my favourite things. I am a complete art project nerd. I love making crafts :) Here is my fool-proof recipe for making amazing cards for birthdays, holidays and more. Better yet, you can find all of the materials at the dollar store. Here's what you'll need:

                            - 1 piece of card-stock or heavyweight paper
                            - 3 pieces of decorative paper
                            - 4 decorative corners
                            - 1 piece of ribbon (about 30cm)
                            - embellishments like sequins, beads, appliques, etc.
                            - scissors
                            - glue (white glue or glue stick)

Step 1: Cut a base out of card-stock

Use a neutral-coloured heavy paper to create the base for your card. Decide if you want your card to open vertically or horizontally. Choose a couple of pieces of decorative papers from the package for your colour palette.

Step 2: Set the border colour

Choose a paper for the border. This will also be the colour on the back of your card.We'll call this paper #1 to help keep things straight. Open the cardstock so that it lays flat. Cover the back of the card-stock with glue and then lay it onto the reverse side of paper #1.

Step 3: Add your background colour

Cut a slightly smaller square out of paper #2 and glue it onto paper #1. Make sure that the corners are glued down tightly.

Step 4: Add the stripe

Cut a thin strip out of paper #3. Trim it so that the edges sit flush with the inside square (paper #2). Add four decorative corners. They come in sticky and non-sticky versions - if they aren't sticky, then add a dab of glue to hold them in place. Once that's done, glue it onto the card.

Step 5: Add the ribbon

Lay down a thin line of glue along the middle of paper #3. Cut a piece of ribbon, lay it on top of the glue and then press it down. Trim the edges to fit and run a tiny bit of glue over the rough edges to stop them from fraying.

Tie a little bow with the remaining ribbon. Stick it onto the middle of the card and seal the rough edges of the ribbon with glue. 

Step 6: Add embellishments

I found these little stars at the dollar store in a package with other shiny shapes. Make sure that you don't have any glue on your fingers when you pick them up, otherwise it'll make them dull. Put three little blobs of glue onto the card and then drop the stars onto them. Press them down and let it all dry.

ALL DONE!
Fill out your card and give it to your loved one :) Remember to mix it up and play with formats, colours, textures and more! Here are some of the other cards I've made.

Talk soon,
Vi

Tuesday, 15 November 2011

OUTFIT OF THE DAY

Sweater: Zara (find a similar one here)
Necklace: Forever 21 (find a similar one here)
Nose Ring: Adrenaline, Montreal (check out their site here)

Super quick post today, since I'm running out the door on the way to work (as you can tell by the bathroom background)! One foolproof way to dress up any simple outfit is by adding a piece of statement jewelry. Great necklaces, rings, bracelets and earrings don't have to cost a fortune either. Check out stores like Forever 21 and Ardene for great costume jewelry. This necklace was only $11 and it's the perfect way to add colour and texture to an outfit. Since costume jewelry is so affordable, you can get a couple of pieces and mix and match them!

Talk soon,
Vi

Monday, 14 November 2011

TOP 5 FAVOURITE BEAUTY PRODUCTS

1. All About Eyes Concealer, Clinique

This is my all-time-favourite, can't-live-without-it beauty product. Just a touch and your eyes will instantly look brighter! There are a couple things that can accentuate dark circles. The obvious answer is that you don't get enough sleep; sleepy complexions are paler than normal, making your under-eye circles look more pronounced. Dark circles also tend to be more noticeable on pale or olive-toned skin. Since my natural complexion is very pale with olive (rather than red) undertones, I pretty much came out of the womb looking tired.

That being said, I have tried just about every kind of under-eye concealer and nothing comes close to All About Eyes. Clinique's concealer has heavy yellow undertones that counteract the purple and grey under your eyes. I use #03 Light Petal and it works like a charm! Another reason that I love this concealer is that the yellowness also combats any hormonal redness, so it doubles a concealer for around my chin and nose. Best of all there is absolutely no greyness or chalkiness. Just smooth, fresh-looking eyes! Perfection!

We all know it. Moisturizing your face is crucial to healthy, young-looking skin. But who can stand the oily residue left by so many moisturizers? Not to worry, Biore's Nourish Moisture Lotion is here! I found this moisturizer a couple of years ago after stealing some from my friend at a sleepover and I have never looked back. My skin is a typical combination complexion; I get oily around my t-zone (across your forehead and down your nose), but dry around my nostrils and chin.

Biore's face cream is nourishing and moisturizing without being heavy. It's also oil-free and it even smells nice! I use it in the morning after I wash my face - before any makeup - and it immediately relieves any tightness or dryness. I also use it before bed to stay nice and hydrated. Added bonus: it has SPF 15 which keeps your skin protected from the sun on a day-to-day basis.

3. Velvety Powder Blush, Marcelle

Marcelle is a great hypo-allergenic skin care and cosmetics line for people with extra-sensitive skin. My sister is allergic to most kinds of eye makeup, so she introduced me to a variety of their products. The Velvety Powder Blush became an instant favourite. This blush blends seemlessly into your skin and doesn't leave you feeling cakey or powdery. I like to use a big fluffy brush to blend it into the apples of my cheeks and back into my hairline. 

The best part about Marcelle's blush is that it the colour is super-pigmented, so it lasts a long time. Unlike many powder blushes, it looks the same after hours of wear. The rich colour choices suit a variety of skin tones and instantly bring a healthy-looking glow to your face.

4. LastBlast Volume Blasting Mascara, CoverGirl

Covergirl's LashBlast mascara is the best of both worlds. It elongates and thickens your lashes in one go. With two quick coats, you can have fake-lash lashes without the all the hassle of glue. I wear this puppy everyday and there's no flaking, smearing or smudging. Another bonus is that it comes off easily with a light makeup remover or even with soap and water. I've tried the black and brown versions and loved them both; the black gives you instant drama, while the brown lends you a doe-eyed, summery look.

I would also recommend the waterproof version. I am usually very wary of waterproof mascaras since I hate using harsh makeup removers, but this came off at the end of the day with a little petroleum jelly. No fuss, no muss. It took quite a beating during the day, when I wore it to the beach while I was on vacation in Greece. Despite the heat, sweat, salt water and sand it stayed put. Very impressive!

Last but not least, I added Maybelline's Eye Studio gel liner. I am a big fan of winged eyeliner, but I found that liquid liner was too much of a pain in the butt for everyday wear. Although pencil liner worked pretty well, it lacked the crisp, defined edge of a liquid liner. Maybelline's gel liner is the perfect solution! It has none of the hassle of liquid liner, but all of its precision. The brush that's included in the package is alright, but I prefer to use an angled eyeliner brush. Just dip it in the little pot and draw on a smooth, straight line. 

The Eye Studio liner lasts pretty well, with only a little fading by the end of the night, but I like to pack a black eyeshadow on top of it (still using the angled brush) to give it extra staying power. I've tried the black, charcoal and brown colours and all of them are great. I especially like the charcoal for everyday since it's a little less harsh than black. Definitely a must-have for the cat-eyed convert!

Hope these products are as great for you as they are for me!
Talk soon,
Vi

Sunday, 13 November 2011

OUTFIT OF THE DAY

Sweater: Garage Clothing (find a similar one here
Tank Top: Costa Blanca (find a similar one here)
Scarf: American Eagle Outfitters (find a similar one here)
Jeans: H&M (find a similar pair here)
Boots: Ecco (find them here)
Glassess: Fendi F855 Eyeglasses (find them here)
Earrings: A local boutique, Chora, Andros, Greece
 
It's a pretty dreary day outside, so I decided to wear a comfy sweater with jeans. As the weather gets colder, it's important to remember that style and comfort don't have to be mutually exclusive. All you have to do to keep nice and toasty is add layers to your outfit.

This v-neck sweater is one of my favourite cold weather staples, because the neckline elongates and slims your figure, while the wrap style defines your waist. Try tying the knot in front, off to the side, instead of at your back. It tends to look more sophisticated.

I also love this AE scarf, since I can wear it in the summer with shorts and a t-shirt or in the fall/winter with a sweater. Versatile pieces like this are a great way to extend your existing wardrobe without breaking the bank. I folded the scarf into a triangle and then loosely tied it in a bib shape around my neck. You could also leave it as a square and wrap is around your neck that way; both are great looks.

I kept my accessories simple with my favourite gold fishy earrings. Gold or silver studs are a must-have for girls with pierced ears. They are classic and very easy to wear. Try different shapes, like bows, hearts or squares, for a fun twist. I went with my go-to brown boots and bomber jacket to finish off my outfit.

Talk soon,
Vi