Showing posts with label How To. Show all posts

Thursday, 24 May 2012

HOW TO: WINGED EYELINER

Eyeshadow (on lids): Covergirl Eye Enhancers #110 (find it here)
Eye Liner: Maybelline Eye Studio Gel Line in Black (find it here)
Eyeshadow (over liner): NARS Duo Eyeshadow in Paris (find it here)
Mascara: Covergirl LashBlast Mascara (find it here)

Hi everyone! I haven't done a beauty post in a while, so I thought I'd do a makeup tutorial today to change things up. As you all know, I'm a complete creature of habit when it comes to makeup, so I pretty much do the same look everyday. I really love winged eyeliner - it's a fun way to add a little personality to a professional, everyday look. Even though a 'cat eye' can seem a bit daunting at first, it's actually very easy to do once you get the hang of it. Check out the tips below and, with a little practice, you'll get the perfect eyeliner every time!

TIPS AND TRICKS
  • Choose a thin, flat eyeliner brush. A good way to tell how well a brush will work is to turn it to the side and gauge the thickness of the bristles. You want it to be super skinny and pointed from the side, even if it's a wider brush. Don't feel obliged to use the brush that comes packaged with the eyeliner.
  • Start small. Use little brushstrokes and build up your line slowly. It's much easier to add more colour than to take some away.
  • Try a gel formula. If you find that liquid liners are messy or too hard to apply, try switching to a gel formula. They are far more precise than pencil liners, but much easier to work with than liquid formulas.
  • Apply your liner before your mascara. This step is important for two reasons. Firstly, your eyeliner and brushstrokes might disturb your eyelashes - making them look spiky or clumpy - if you've already applied your mascara. Secondly, you can wiggle your mascara wand at the base of your eyelashes to fill in any empty spots that you might have missed. 
  • Seal your liner with eyeshadow. Like any liquid or gel makeup product, eyeliner lasts longer and looks 'blacker' if it's sealed with a powder. Think of how you dust powder over your foundation with a fluffy brush. Do the same thing with your eyeliner by packing a little black eyeshadow onto your eyeliner brush and (carefully) pressing it onto the line.
Dip your eyeliner brush into a gel or liquid liner and wipe any excess product onto the lip of the container. For the best results, be sure that the bristles of your brush stay flat and thin. Line the front of your brush (the widest part) up horizontally with the base of your eyelashes, so that the top of the bristles leave a thin line against your eyelid. Starting at the middle of your lid, confidently draw the brush towards the outer corner of your eye. Stay as close to your lash line as possible.

Add a little more product to your brush, using the same technique as before, and slowly build up your line. Draw the line down towards the inner corner of your eye using small, thin strokes. You want the line to be the thinness towards the inner corner of your eye and slightly thicker towards the outer corner of your eye. Use small brushstrokes to thicken the outer third of the cat eye.

Once you are satisfied with the shape and thickness of the line, use the thinnest part of your brush to create a small extension. Place your brush at the outer corner of your eye (where the top and bottom lids meet) and draw the product up to meet the top edge of your eyeliner. Like a little triangle. Depending on how dramatic you want to be on a scale of one-to-Adele, add little brushstrokes to extend the cat eye. Once you are all done, keep your eyelid closed and give the liner a minute to set (especially if you are using a liquid formula!).

Have a great Friday!
Talk soon,
Vi

Monday, 14 May 2012

HOW TO: FIT A ROMPER

Hi everyone :) One of the biggest trends that we saw last summer was the romper and, as the weather warms up, it seems to be coming back for round two! There's something so youthful and playful about rompers. That said, it can be hard to find one that suits your body type, since they have to fit both your top and bottom halves properly. If you're having trouble finding the perfect romper, here's what to look for:
Arms/Straps: The straps or arms of a romper are one of the easier parts to fit. If you have a bigger bust or broad shoulders, try a style that has adjustable straps (like the kind on a bra) so that you can lengthen or shorten them to fit. You should also choose a style that suits your body type. For instance, if you want to minimize your upper arms, try longer sleeves or a thick strap instead of a strapless model. Don't be afraid to try on different styles to learn what suits your figure!

Bust: It's very important to fit your bust properly in a romper, so that it will flatter your shape. If you want to amp up your bust, try a little embellishment around the neckline or a bustier bodice. On the contrary if you want to flatter a big bust, make sure to find a structured model that will shape and support the girls - best to steer clear of strapless versions, unless they have a lot of tailoring. If you get stuck, think of the kinds of shirts and tank tops that look best on you. How are the constructed? What's the neckline? Look for those same features in a romper and you'll be set :)

Torso: Oh the torso...this is one of the toughest parts of fitting a romper. If you're short, or you have a short torso, rompers tend to bag around the bum because of the extra fabric in the middle. If you're tall, or you have a long torso, most rompers probably give you a massive wedgie because there isn't enough fabric in the middle. The trick is to look for a romper that's constructed the same way as your favourite tank top. If you need more room for a long torso, find a romper with a low waistband (like the long-sleeved navy version above). Similarly if you have a short torso, play around with higher waistbands (like the pink and white model above) to balance your proportions.
Waist: In order to get the best possible fit in your romper, you want to be sure that it nips in at the waist to accentuate your figure. If you're wearing a high-waisted style, then the waistband of the 'shorts' part of the romper will naturally accentuate your waist. However if you go for a low-waisted romper, then you'll want to be sure that the top of the romper falls close to your body so that you maintain the line of your silhouette.

Hips and Legs: Last but not least, you want to be sure that the legs and hips of your romper fit properly. This part is relatively easy if you consider how you usually wear your shorts. Do you prefer low-waisted or high-waisted styles? Do you like embellishments like cuffed shorts and front pockets? All you have to do is look for these same characteristics in a romper and you'll be ready to romp the summer away!

Wishing you summer onesies!
Talk soon,
Vi

Monday, 23 April 2012

HOW TO: SHOP ON A DIME

Hi everyone!! Today's post is all about how to shop without breaking the bank. Because, let's be honest. I'm a student, I'm broke and my student loans aren't about to repay themselves. But the fact is, I really like to shop. Correction, I love to shop. Obviously not in the same way that I love my family (read: pretty close), but clothes make me feel happy, pretty and creative. So instead of selling my organs on the black market to feed my need, I've devised a guide to budget buying. The first three rules focus on how to save money before you leave the house, while the last seven show you how to shop smart. Ladies and gentlemen, may I present ten simple rules to shop by.
Whether or not you're on a budget, you want to cultivate an organized, cohesive wardrobe over time. Think of the 70/30 rule; about 70 percent of your wardrobe should be reserved for classic, timeless pieces. These things could include a well-fitted t-shirt, a great pair of sexy jeans, a tailored blazer or a beautiful sweater. Fill up the rest of your closet (the remaining 30 percent) with fun accessories, trendy items and statement pieces, like a studded dress, an edgy leather jacket or a pair of pink snakeskin pumps.

The trick is to keep all of this in mind while you're shopping. What do you need to complete your wardrobe? Is there something that you've had your eye on for a while? Try keeping a wishlist on your phone or in your day book. This will remind you of what you really want to spend your money on and prevent any impulse buys that you may regret later. In short, you can save money by keeping your eye on the prize.
The problem with an unplanned shopping spree is that it can lead to unplanned spending. No matter how badly you want something, you have to pay for it eventually. So ask yourself... 'Can I afford this?' If the answer is anything other than 'yes', move on. This doesn't mean that you can't have it ever, you just can't have it now. Put it on your wishlist and give yourself a couple of days to mull it over. Chances are, it won't seem that great once the fever passes.

Remember, some things are worth going into temporary debt over (houses, children, traveling overseas to de-worm orphaned babies, etc.), but other things just aren't worth it (shoes, bags, a really cute leather dress that you swear you'll wear more than once, etc.)
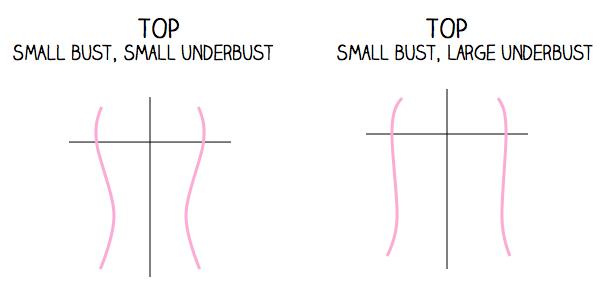
This rule may seem silly, but it's actually a crucial step towards shopping smarter! If you know your body, understand your proportions and accept the styles that do and don't flatter your figure, you will avoid wasting money on things that you'll never wear. If it fits your body, your style and your budget, then buy it. If it's on sale, but it hangs funny when you try it on - pass. If it looks really cute on the hanger, but it doesn't fit - pass. If it looks really cute on your friend, but doesn't fit - pass.

If you have limited funds (or even if you don't!), you want to conserve your money for the things that matter. So no matter how low the price or how big the sale, don't buy it unless you love it.
Outlets are to recessionistas what mac n' cheese is to grad students. A lifeline. Outlets are stores where manufacturers sell their products directly to the public. They usually contain a small selection of new merchandise and an extensive selection of older products, which are sold at marked-down prices. They used to contain mostly 'oops' items - like batches of clothes that were mis-dyed - but now they are more like extended sale sections.

Outlets are great for several reasons. Firstly, they tend to be grouped together in malls, which gives the frugal shopper a 'safer' place to shop. Secondly, they offer brand name items at discounted prices. For instance, I really love the Banana Republic, J Crew and Club Monaco, but I can't begin to afford their regular prices. Their outlet prices, however, are much cheaper, so I can get the clothes that I want for a price that I can afford.

For those of you who live in the Toronto area, check out these outlet malls (all less than four hours away):
Vaughn Mills, Vaughn, Ontario
Dixie Outlet Mall, Mississauga, Ontario
Fashion Outlets of Niagara Falls, New York
If you live in a country that has limited access to your favourite brands, ordering from their online stores can be a tempting option. But be careful - foreign shipping is usually a fortune!! I can't tell you how many times I've found a great deal online only to realize that it's actually a terrible deal once Canadian shipping is added.

So what can you do about it? If you want a certain product but your local store is out of stock or doesn't carry it, ask them to check nearby stores and give you the address of a store that does carry the item. Then just drive over and pick it up, instead of having it shipped to your door. If they don't ship to a store near you, then skip down to rule #7.
As alluring as the quilted black leather of a Chanel bag or the bright red underside of a Louboutin shoe can be, buying brand names isn't always the smartest choice for your closet or your bank account. So before you invest in a brand name piece, consider the quality, use value, fit and style of what you're looking for. Can you find a similar item that looks and feels the same, but costs less? Are you investing in the item itself, or do you really just want to buy the designer?

Take a moment and acquaint yourself with a variety of stores. Check out high street stores and department stores like Zara, Top Shop and Forever 21 before you bust the bank. Chances are that you'll find a similar style that is equally suitable to your wardrobe for a fraction of the designer price. Then, if you really can't find anything that meets your demands, you can invest in the big ticket item with a clear conscience.
When you have your heart set on a piece that you just can't afford, it can be really disappointing. But before you despair, take a gander online to see if you can find a cheaper model. Start by typing the name and make of what you want into the search bar and sift through the sites that pop up. Sometimes, you can find the exact same item second hand for a fraction of the cost. Another great option is sites like Amazon (find it here), that sell items through individual vendors. You can also check out small-scale vendors on Etsy (find it here), who might be making something similar for a more affordable price.

A fabulous resource for the budget-savvy fashionista is group discount sites, such as Zozi (find it here), Groupon (find it here) and Beyond the Rack (find it here). These sites cut deals with companies by providing them with large amounts of business. All you have to do is sign up and you can browse their wares from the comfort of your own home! Last but not least, you can always use your computer to go straight to the wholesaler and see if there is a discounted price when you buy it from the source.
If you're dying for a big ticket item but you can't scrape together the cash to buy it, try asking for it as a gift. Since most people would much rather get you a gift that they know you'll love than something that you'll never use, they'll probably be more than willing to have you pick out your own gift. When I graduated from university, my parents offered to buy me a gift of my choosing and that's how I ended up buying my favourite Tissot watch!

Keep in mind that people have different gift budgets, so if you're nervous that your item might be too expensive for someone, then ask them to give you money to put towards the purchase. People tend to be wary about giving cash because it seems impersonal, but if you show them the piece that you've got your eye on, then they'll be able to connect their cash gift to something tangible. It works out best for both parties, because you get your dream gift and they get to give it to you!
A great way to revamp your look without spending a lot of money is to DIY. Simple accessories, like bracelets, bangles and necklaces are actually quite easy to make. Try covering a cheap bangle with embroidery thread for a whole new look. Check out my "How To: String Bracelets" post for a quick and easy (and cheap!) jewelery overhaul.

If you're feeling adventurous, you can even try making clothes! Start small with a flowy skirt or a simple dress and then move on to more tailored pieces as you gain experience. Your sewing skills will also come in handy when you need to tailor your clothes - but make sure that you buy clothing that only needs a tweak here and there or else it could end up adding up.
Last but not least, there's the duty free store at the airport. While this may sound a little far fetched, you'd be surprised by how convenient it can be. Buying duty free can mean big savings if you live somewhere like Canada where sales taxes are quite high. Even if you don't travel very often, you can have a friend or relative pick up your purchase the next time that they fly. While this may not be the most common way to shop, it's definitely worth thinking about next time that you plan a trip!

Better yet, most airports carry a variety of high end brands and designer boutiques, which allow you to buy items that would normally be very expensive without paying sales taxes. For instance, when I bought my Tissot watch (which was a graduation present from my parents), I bought it in the Athens airport on the way home from my summer vacation and ended up saving a bundle.

If you want more tips and tricks about how to shop on a budget, check out these great websites:
The Budget Fashionista 
The Budget Babe
Frugal Fashionista
Broke and Beautiful
She Finds

Happy shopping!
Talk soon,
Vi

Friday, 13 April 2012

WEEK 3: THE SOCK BUN

This Week's Mission: This week's mission was supposed to be false eyelashes, but after several failed attempts I decided to try the sock bun instead and leave the devil lashes for next week. I think I'm going to try individual ones instead of a full set and see how it goes. Wish me luck.

Inspiration: I originally saw the sock bun in a video tutorial on Youtube and, suddenly, everything made sense. I kept seeing all these girls with voluminous, luscious buns, but I couldn't for the life of me recreate the look in my own bathroom. I mean, how hard could it be?! On a scale from one to unmanageably thick hair, I'm doing pretty well, but my buns always looked small compared to those gracing the heads of in-the-know fashion bloggers. And when I did manage to get all of my hair on top of my head, the bun would get all frizzy and slip down throughout the day. Not to mention that bobby pins would disappear into my hair only to resurface days later after repeatedly stabbing me in the scalp. Needless to say, buns were not my thing. But after trying the sock bun today, I can honestly say that I'll be wearing them much more often - it's so easy to do! 

Tips and Tricks: After watching a bunch of tutorials, I kinda played around with my hair until I found what worked best for me. Most tutorials will tell you to start with the sock around the end of your ponytail and slowly roll it down towards your head until you have a nice big bun. Unfortunately, my hair is layered, so this technique really didn't work very well. Every time that I tried to roll the sock down, a thousand little pieces of hair escaped.
Instead, I rolled two socks together to make a chubbier ring (so that the middle hole was smaller and the ring was tighter around my ponytail) and slipped it down around the base of my ponytail. Next, I fanned the hair around the ring to cover the sock and then wrapped the remaining hair around the sock like a normal bun. I tucked the ends under the sock ring and secured it with an elastic. Add a couple of pins to keep everything in place and you're good to go :)

Results: LOVE it! Not only does the sock bun look thick and round, but it stays in place all day long. I didn't have to readjust it at any point in throughout the day and there were no annoying pieces falling out. I'll definitely be repeating this look!

Talk soon,
Vi

Monday, 9 April 2012

BATHING SUITS FOR YOUR BODY TYPE

As the weather gets warmer and gyms become more crowded, bathing suit season begins its slow approach. If you have trouble finding a flattering bathing suit, then you are not alone. Since so many women have mixed body types, the classic apple, pear, hourglass and boyish/athletic shapes are not always effective. Therefore, I've organized my breakdown into eight different categories to cover a wider range of shapes and sizes; all you have to do is choose a 'top' and 'bottom' shape from a selection of four silhouettes and you're ready to go.

1. FULL BUST: If you have a full bust, bathing suit season brings on the inevitable challenge of finding a swim suit that supports both your chest and sense of style. However, not all large-busted women are built the same. Your frame can vary greatly depending on the size of your underbust as well. To determine the shape of your underbust, look at your ribcage and waist in the mirror. If you have a narrow waist and small ribcage, then you most likely have a small underbust. Similarly, if you have a wider ribcage and a more 'up and down' middle, then you have a larger underbust. A small underbust is the staple of the classic hourglass figure (think of an upside down triangle), while larger underbusts are usually attributed to boyish, athletic or apple-shaped silhouettes.

Now that that's out of the way, here's what you should look for in a bathing suit. The key to flattering a large bust is support. You want to be absolutely sure that your girls are lifted and supported whether you're basking in the sun or playing beach volleyball. No nip slips. Look for suits with built-in support, such as underwires, well-constructed cups and thicker straps. You'll want enough padding to round and shape your bust, but you can feel free to toss out the padded inserts that come with the top. Halters are always a good option if you get stuck.

Choose colours and patterns based on your figure goals. If you want to minimize your chest, stick to darker colours and solids, as well as small patterns. On the contrary, if you want to flaunt what you've got, then play around with colour and pattern. Just remember that support is your number one goal. Use structural details like ruching and tailoring (like in the lavender number below) to de-emphasize a larger underbust or try a string underwire (like the teal top below) that lets you adjust the width of your suit more easily.

Avoid un-supportive string bikinis and bandeau tops. While some string bikinis are reinforced to support a larger chest (check out Victoria's Secret for some more tailored options), most triangle tops don't have the gumption to hold up the girls. It's just not worth the back ache. If you're really dying to try a bandeau top but you have a full chest, try one with halter straps (like the blue and white one above). This will give you the bandeau look with a bit more support for your ta-tas.
2. SMALL BUST: If you aren't well endowed, do not fear - small breasts give you much more flexibility when it comes to bathing suits! Since you don't have to worry as much about support, feel free to play around with different shapes and cuts. Things like ruffles, horizontal stripes and bows will give you a little boost if you're trying to balance out a bigger bottom. You can also emphasize your chest by wearing light colours like blush and white on top.

If you want to de-emphasize a large underbust, look for plunging bathing suits and v-neck tops. The long, v-shape of the swimsuit will elongate your figure, making your underbust look longer and slimmer. Moreover, the plunging neckline will also accentuate your cleavage so that you don't loose the look of your bust.

It's important to rock your smaller chest with as much pride as a bustier woman would. While you may choose bathing suits that emphasize your bust, feel free to buy a bandeau or triangle top and emphasize your collar bone or waist instead. Think of Kate Hudson and Keira Knightly - both women who fearlessly flaunt their little busts!
Avoid...not much. If you're trying to exaggerate your cleavage then stay away from un-padded string bikini and bandeau tops, since they won't give you any extra help in that department. Otherwise, you can experiment with pretty much anything.
3. WIDE HIPS: Okay now for the bottom half. In order to know which bathing suits will flatter your figure, you have to return to the mirror. Firstly, stand facing the mirror and determine whether you have wide or slim hips. Wide hips will generally give you a rounder shape just below your belly button, while slim hips will give you a more 'up and down' appearance. Next, turn to the side and check out your assets. Do you have a round bum or a flatter bum? Once you've figured out your body type, then you're ready to get started.

Wide hips are a classic feature of the hourglass and pear shapes. You're gonna want to find a bathing suit that flatters your hips, without making you look too bottom heavy. Look for bottoms with little to no waistband, like string bikinis and looped attachments. This will create a higher leg line, making your legs and hips look longer and slimmer.

If you have a full derriere, try bottoms that cut up across your bum to reveal a bit more cheek than the standard bikini cut. While you would think that showing more skin would make your bum look bigger, it actually has the opposite effect. The extra fabric of a swimsuit bottom can give you 'diaper butt', making your butt look bigger than it is. If you want to minimize your bum, stick to dark colours and solid fabrics on the bottom.

If you have wide hips but you need a little boost in the butt department, look for details like ruffles and ruching which will add volume to the area. Be careful not to disturb the line of your leg and stick to the no-waistband rule above. You want ruffles and detailing on the back of the suit to boost your bum, but no added volume around the waistband of the suit, which might accentuate the width of your hips.
Avoid horizontal stripes (unless you want to boost your bum), wide waist bands and high waisted bottoms. If you are trying to downplay a larger bum, stay away from details like ruffles and ruching that add volume to your assets.
4. SLIM HIPS: If you have slim hips - a classic feature of the apple, athletic and boyish frames - you have a lot more freedom when it comes to choosing a bottom. If you are trying to balance out a bigger top half, try bathing suits with thick waistbands (like the red polka dot one below). The width of the waistband will accentuate your hips and add a bit of volume to your bum. If you have slim hips but a full bum (lucky duck!), then look for a bathing suit that shows a bit more cheek. As I mentioned above, it will help accentuate your assets without giving you diaper bum. Slim hips also allow you to get a little more creative with your one-piece swimsuits, but remember to take you bust and underbust into account when choosing a style.

For those of you with slim hips and little bums, give yourselves a boost by wearing light colours on the bottom. Since you don't have to worry about adding volume to your bottom half, try a cute pair of boy shorts. Not only will these emphasize your derriere because of their high cut across the back, they will also help balance out the bottom of your body.

Moreover, slim hips allow you a bit more freedom when it comes to colour and pattern. Play around with horizontal stripes, bold patterns and bright colours. You can also look for details like ruffles and ruching if you want to add more junk to your trunk.
Avoid ... not much. If you want to balance out a bigger top half, avoid minimizing cuts like string bikini bottoms. If you're trying to pump up your derriere, stick to styles that will add volume to your bum like boyfriend shorts and ruffled bottoms.

Hope that helps you beat the bikini heat!
Side note: I just bought some false eyelashes for the third part of our '4 in 4' challenge!
Talk soon,
Vi

Tuesday, 3 April 2012

HOW TO: MAKE A HEADBOARD

Hi everyone! I've been on a home decor binge ever since I signed the lease for my new apartment a couple of weeks ago and I decided to take my craft projects to the next level by making my own padded headboard. I got the idea after seeing a couple of DIY blog posts on the subject and decided to give it a try. Although I'm a craftaholic, large-scale projects involving lots of construction are way out of my element. This headboard was definitely tricky and involved learning lots of new skills, but it turned out so great! I can't wait to use it in September!

If you're like me and you know little to nothing about wood and building materials, don't be afraid to get help. Bring your measurements to a hardware store and ask one of the employees for a hand - they're usually very knowledgeable about construction materials and home projects. I went to Home Depot and one of the guys in the lumber department taught me the best way to build the frame and showed me what supplies I would need. It's also a good idea to get the wood planks cut to size while you're at the hardware store (it's free most places) so that you don't have to bother doing it yourself.

YOU'LL NEED:

4 Wooden Planks
8 1/4" Wooden Dowels
Power Drill 
Hammer
Wire Clippers
Pliers
Scissors
Staple Gun
Carpenter's Glue
Chicken Wire
1 Roll of Extra-Thin Wire
Batting (pillow fluff)
Coloured Fabric (approx. 5' x 3'5")
Scrap Fabric (for the back)
6 Buttons

STEP 1: TAKE MEASUREMENTS
First things first, you need to figure out the dimension of your headboard. The measurements above are for a double bed with a headboard measuring approximately 2.5' (above the mattress level). Even if you have a double bed, grab a tape measure and double check the measurements - the dimensions of your project may vary depending on the thickness of your mattress, height of your box spring, etc.

You will also need to factor in the width of the boards that you are using. For instance I bought 3.5" pine boards, so the horizontal sections of my frame had to be cut 7" shorter than the total horizontal length (3.5" from each side). If you get confused, flag down an employee at the hardware store and they can help you figure it out.

STEP 2: DRILLS HOLES AND INSERT DOWELS
Lay out your wood planks on the floor in the shape of your frame. On the end of each horizontal piece, measure where you want to put your dowels and make a mark with a permanent marker. Realign your planks on the floor and use the markings that you just made to mark the vertical sections (see above). Take your time during this step, because the more accurate your measurements, the less trouble you will have in assembling your frame.

Next, gather all four planks and head over to the drill. One by one, secure each plank of wood with a wood clamp and then drill a hole for every mark. The holes should be deep enough to fit half of the dowel. Next, insert your dowels; put a little drop of carpenter's glue into each hole before hammering the dowel into the slot.

STEP 3: ASSEMBLE THE FRAME
This is one of those easier-said-than-done steps. No matter how carefully you measure, you're probably going to have trouble matching up the holes and dowels. Don't panic. Starting with one horizontal piece and one vertical piece, line up the dowels with opposing holes. Remember to add a line of carpenter's glue for extra strength and stability before you fit the pieces together. Use your hammer to pound the boards into place.

If you find that one of your holes refuses to line up, then use the drill to (slightly!) widen the hole until the dowel can slide in. Don't be afraid to muscle the last couple of boards into place.

STEP 4: WIRE THE CENTRE
Once the frame has dried, lay it flat onto the floor. Starting at one end, unroll the chicken wire across the centre of the frame. Use a staple gun to secure the vertical edge (the short edge) to the wooden frame and then staple along the horizontal edges (the long edges) as you unroll the wiring. Stop to regain feeling in your elbow before continuing.

When you get to the far end, grab your wire cutters and cut off any excess chicken wire that's left. Use a pair of pliers to fold down the pokey ends of the wire - watch out, it's sharp!

STEP 5: ADD THE BATTING

Next, you have to add the batting. Unroll a thick layer of batting across the headboard frame. You want it to be about 2"-3" thick, so that it will look nice and soft once it's covered. Remember to leave enough extra batting around the edges to cover the sides of the frame as well.

This is the tricky part. Lay your fabric on top of the batting with the patterned side facing up (ie. the pattern and batting shouldn't be touching), then take a deep breath and flip the whole thing over. Now your fabric should be lying patterned-side down (ie. pattern against the floor) with the frame on top. Don't worry if the fabric is crooked, you can adjust it after securing the batting. Pull the lip of batting around the back of the frame and staple it down. Do this for every side of the frame expect the bottom.

STEP 6: COVER THE FRONT
Now's the time to adjust the fabric underneath the frame - be especially careful if your fabric is patterned because you want the pattern to be straight when you flip it over. Also double check that the fabric is facing the right way. The first time I did this I started stapling the fabric only to realize that it was backwards - gaahh!

Wrap the fabric around the back of the frame and start stapling it into place, pulling it tight as you go. When you get to the corners, fold the fabric like you would the corner of a birthday present and staple it down. When you get to the bottom board, flip the frame back over. Tuck the excess fabric under the batting (this is why you didn't staple the batting down on this side) and then staple it down as close to the bottom of the board as you can.

STEP 7: SEW ON THE BUTTONS
Tired yet? Almost there! The second last step is adding the buttons. You'll want to re-measure your frame, since the batting will have changed the dimensions. Divide the width by four and the height by three to calculate where to put each button (see above). I used sewing pins to mark each spot.

For each button, clip a small section of thin wire (about 8" is enough) and fold it in half. Thread the button onto the wire and then poke the sharp edges through the front of the headboard. Pull it through the batting and chicken wire on the other side. To make the headboard look indented or 'tufted', clamp your pliers at the base of the wire and twist them to tighten the button. It's much easier than trying to tighten them by hand. Repeat this until all the buttons are done or until your hand goes numb :)

STEP 8: COVER THE BACK  
Last but not least, cover the back of the headboard with some scrap fabric (I used the leftovers from a roll of cheap unbleached cotton) to hide all of the ugly chicken wire and button fastenings. Just cut it to size and staple it on.

And there you have it!! This project took me two days and it's definitely one of the more challenging ones I've done. Mostly because I don't know anything about construction. But now I do. And you can too! I really love how it turned out and I can't wait to use it in September :) It was also much more cost-effective than buying a padded headboard, which can run anywhere from $200 to upwards of $1000! This only cost me about $50...schveet!

Talk soon!
Vi

Monday, 2 April 2012

WEEK 2: FISHTAIL BRAID

This Week's Mission: The fishtail braid. Let me say for the record: easier said than done. The actual braid itself is pretty easy peasy, but making the rest of your hair stay put is another story. 

Inspiration: I've been seeing this look a lot on the red carpet lately, so I watched some youtube videos to learn how to do it. The best one was by The Beauty Department. If you aren't familiar with them, the Beauty Department is a group of young women (and men??) - most notably The Hills' Lauren Conrad - who post blogs and videos about hair and makeup. Check out their website here or watch the video on fishtail braids here

Tips and Tricks: Having layered hair definitely complicated things. Little wisps kept escaping from the braid, so I used a light mist of hairspray to give the strands more texture - it seemed to make them a bit more manageable. I also sprayed dry shampoo onto the roots of my hair to give them a little lift. If you have bangs, you could probably leave them out to frame your face. The biggest pain in the butt was keeping the hair in the braid at the base of my neck. I ended up using a little alligator clip to secure everything. 

Results: Generally speaking, I'm not the biggest fan of braids. I think that they have an unfortunate tendency to make people's heads look small. Nevertheless, this look was pretty cute. The hardest part wasn't the braid itself, but rather trying to get everything to stay put. I had to add a ton of pins here and there to keep everything in place and I found that it detracted from the aesthetic of the look. When I finally secured the front, the back looked a little odd and vice versa. While I can't say that I'd wear it everyday, I would definitely wear a fishtail braid with a cute summer hat (to solve the weird-looking back problem)!

As you know, some of my friends are doing the 4 in 4 challenge with me - check out their looks below! Did you guys try this trend? Send in a picture of your look and I'll post it here!

Next week's challenge: false eyelashes!
Talk soon,
Vi

Sunday, 25 March 2012

WEEK 1: DARK LIPSTICK

This Week's Mission: Dark lipstick. I used a Smashbox lip colour that I got as a gift in a palette kit, so the products weren't fully labeled, but I think it was Infrared Matte (or one shade browner). You can check out all the Smashbox lipstick colours on their website (find it here).

Inspiration: I'm super addicted to The Good Wife lately and the main character (played by Julianna Margulies) always wears the best dark browny-red lipstick.

Tips and Tricks: Between bleeding and smearing, dark lipstick can be a pain in the butt to apply. I find that it works best if you start by exfoliating and moisturizing your lips. Lipliner is a must with dark shades because it helps the colour stay put. If you want a step by step guide on how to apply bold lip colours, check out my "How To: Red Lipstick" post (find it here).

Results: I really liked this look once it was all said and done. As long as you have the lip colour in your purse for touch ups (dark lipstick needs to be touched up during the night because it fades around the opening of your lips), it's quite easy to wear! I also found that it was surprisingly flattering against my complexion. Although it does accentuate your fairness, it also brings out the rosiness in your cheeks :) I will definitely wear this look again!

Some of my friends decided to join me for my 4 in 4 challenge - check out their looks below! Alex (left) and Lauren (far right) both chose Revlon's Colourburst Lip Butter in 040 Red Velvet (find it here). Did you guys try this trend? Send in a picture of your look and I'll post it here!

Stay tuned for next week's beauty challenge!
Talk soon,
Vi